Quote:
Originally Posted by dadiOH[_3_]

That is *WAYYYY* too thick! On butt joints at least.
Step #1 is to make sure the joints are securely fastened. If they aren't,
the joints will crack. One way to tell is to put your finger lightly on the
joint and have someone else thump the wall lightly with their fist a foot or
so away. Can you feel movement with your finger? (Note: you can't do your
own thumping).
Step #2 is to bed paper tape. Use only enough mud and width to bed and
slightly cover the tape.
Step #3 - after #2 is dry - is to sand as needed and apply more mud using a
wider knife. You aren't trying to cover the tape with this, you are filling
the gap along the edges of the tape created by the taped area being thicker.
Step #4 is to repeat #3 but with a still wider knife. By the time you work
up to a 10" knife the tape hump will be pretty much invisible even if it was
on butts, not tapered edges.
You mentioned that the cracks were over 3 mils. A human hair is about 3
mils so your cracks don't sound like a disaster. If the sheets are well
fastened, rubbing some acrylic caulk into them before painting as Norminn
suggested (she's a sharp cookie  will fix them nicely. |
It's true that you need to determine what caused the drywall joints to crack and correct that problem first. Then, the way DadiOH is explaining the repair procedure could be simplified immensely by purchasing something called a "curved trowel".
Since I own a $25 curved trowel, the way I would proceed would be as follows:
1. Apply fiberglass mesh drywall joint tape over your existing cracked joint.
1 /2. Dilute some white wood glue with sufficient water to make it into a paintable consistancy and paint that glue onto the fiberglass mesh drywall joint tape. As the glue dries, it'll bond the fiberglass mesh to the painted drywall. This is an optional step. If you use "Regular" drywall joint compound for your first coat, you probably don't need to bother with this step because the glue in the joint compound will make it both stronger and bond to the paint better, and that will be sufficient to hold the tape securely in place, even when the wall bends. Where you'd need to do it is if you used a weaker mud to bury your fiberglass mesh tape in, like "Finish" drywall mud. The glue will ensure that the fiberglass is securely bonded to the surface of the wall even if the joint compound it's buried under isn't strong enough to carry the kind of stresses the tape may have to. Painting with diluted glue effectively allows the tape to do it's job of transfering tension from one sheet of drywall to the next without having to rely on the joint compound to be strong enough to hold that tape securely in place while it's under stress.
2. Use a "curved trowel" to spread a perfectly symmetric bed of drywall joint compound about 5/64 inches thick (in the middle) to bury the fiberglass mesh tape, but still not have a visible "bump" showing on the wall.
Take a real close look at this curved trowel:
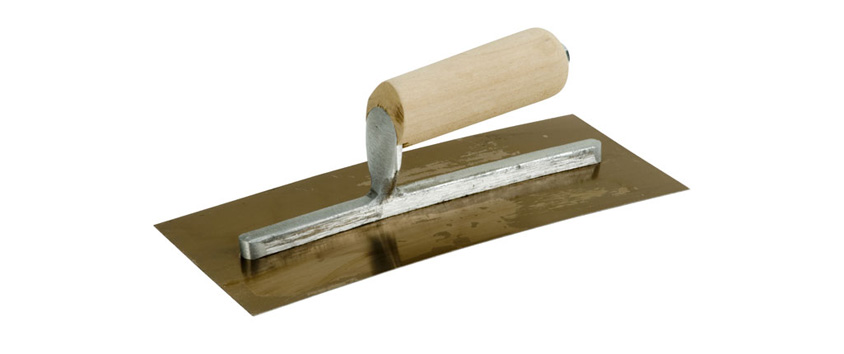
At first glance, it looks like an ordinary plastering trowel. But, when you set it down on a flat surface, like a table top, or sight along it's edge, you'll find that it arches up about 1/8 of an inch in the middle; like this:

Note that the gap between the straight line and the trowel is widest in the middle and narrowest at the ends. So, if you were to set the trowel down on a flat surface, there would be a 1/8 inch gap under the middle of the trowel.
And, since you hold the trowel at a comfortable working angle to the wall when using it, a curved trowel allows an absolute newbie to spread a perfectly symmetric mound of drywall joint compound that will only be about 5/64ths of an inch thick in the middle, and taper to zero thickness on both sides of the mound in a symmetrical fashion. And, that newbie will be able to do that right off the hop without having to rely on years of plastering experience that he doesn't have.
5/64ths of an inch is more than deep enough to bury fiberglass mesh tape in, but not nearly thick enough to cause a visible "bump" to be seen on the wall, even if you have wall mounted light fixtures. My sister used my curved trowel to refinish the basement drywall in her house after a mini-flood caused by her sewer backing up. She has wall mounted light fixtures, and I cannot see that the bottom 12 inches of drywall were replaced with Dens-Shield throughout her basement (and I know where to look cuz I showed her how to do every step of that repair work using my tools). ((I provided the advice and the tools, the Bank of Dad provided the money for materials, and she provided the elbow grease. And now no one would ever guess that her basement was ever flooded.))
And, you should also be aware that there are different kinds of drywall mud:
A. "Regular" or "Taping" drywall mud has the most glue in it. It sticks to the drywall better and the paper tape sticks best to it. But, because of the glue, this kind of mud dries the hardest, and is therefore the most difficult to sand smooth. It's typically only used for the first coat.
B. "Finish" or "Topping" drywall mud has the least glue in it. As a result, it dries the softest and is the easiest to sand smooth.
C. "All Purpose" is about half way between Regular and Finish. It's popular with drywall contractors because it allows them to use one mud on small jobs for both taping and finishing.
In this case, if I were you, I'd probably use All Purpose drywall mud. Or, use Regular to bury the fiberglass mesh, allow to dry, hold a bright light up to the joint compound and scrape off anything sticking out proud of the mound with a sharp paint scraper, and then use Finish drywall mud to give the repair a second coat. For the second coat, use a normal plastering trowel or wide taping knife moving perpendicular to the direction you used the curved trowel in so as to follow the contour of the mound. Typically, it takes a good three coats to get a smooth surface to prime and paint over. When I do this kind of work, I don't sand the first or second coats; I just scrape off anything sticking out with a paint scraper and apply the next coat. After sanding the third coat, be sure to wipe the sanding dust off the wall so that it doesn't interfere with the adhesion of the primer or paint.
Finally, ALWAYS ALWAYS ALWAYS shine a bright light at a sharp angle to the plastering work you do to inspect your progress between coats. The sharp angle of the lighting will make every glitch in your plastering stand out, thereby giving you a much better mental image of where you need to add mud and where you need to remove it to make the surface smooth. When your plastering looks "Could be worse" under such critical lighting, it'll look "Not too bad" under normal lighting. When it looks "Good" under critical lighting, it'll look "Perfect" under normal lighting. The hardest plaster/drywall repairs to do (on non-textured surfaces) are on ceilings where ceiling mounted light fixtures make every imperfection stand out, thereby requiring a perfect plastering job before priming and painting.
Hope this helps.